锁的优化及注意事项

一、几点建议

锁将导致整体性能下降,这里有几点建议。

1.1 减小锁持有时间

程序应该减少对某个锁的占有时间,减少互斥的可能。下面的代码为例:

1
2
3
4
5
public synchronized void syncMethod() {
othercode1();
mutextMethod();
othercode2();
}

假设在 syncMethod 方法中只有 mutextMethod 方法是需要同步的,而 othercode1othercode2 方法不需要同步,而假设这两个方法是重量级的,需要时间去使用 CPU ,那么需要大量等待,一个更好的方法是:

1
2
3
4
5
6
7
public void syncMethod2() {
othercode1();
synchronized(this) {
mutextMethod();
}
othercode2();
}

现在我们仅仅对 mutextMethod 方法进行同步,占用时间短,而且有更高的并行性,这样类似的还有比如正则表达式的『Pattern』类:

1
2
3
4
5
6
7
8
9
10
11
public Matcher matcher(CharSequence input) {
if (!compiled) {
synchronized(this) {
if (!compiled) {
compile();
}
}
}
Matcher m = new Matcher(this, input);
return m;
}

可以看到 matcher 方法有条件地进行锁申请,进行局部加锁。

减少锁的持有时间有助于降低锁冲突的可能,进而提高并发能力

1.2 减小锁粒度

减小粒度是一种削弱多线程的一种手段,比如『ConcurrentHashMap』,之前说到过,使用『Collections』包可以实现线程安全的『HashMap』,其中使用了「mutex」对象进行互斥。

对于『HashMap』而言,最重要的自然是 get 方法和 put 方法,我们如果全局加锁,那么锁的粒度太大,在『ConcurrentHashMap』中,将细分若干小的『HashMap』,这些被称作,默认下一个『ConcurrentHashMap』被分为16个段。

如果现在往『ConcurrentHashMap』中添加元素,不是将整个『HashMap』加锁,而是根据「hashcode」决定将该项放到哪个段中,然后对段进行加锁,如果多线程执行 put 方法,只要不是同一个段,那么就是真正的并行!

因为默认是16个段,如果够幸运,应该最多能同时接受16个线程,大大提高了吞吐量。下面是 put 方法的源码:

1
2
3
4
5
6
7
8
9
10
public V put (K key, V value) {
Segment<K,V> s;
if (value == null)
throw new NullPointerException();
int hash = hash(key); // 获取 key 相应的 hash
int j = (hash >>> segmentShift) & segmentMask; // 获取段序号
if ((s = (Segment<K, V>)UNSAFE.getObject(segments, (j << SSHIFT)+ SBASE)) == null) // recheck
s = ensureSegment(j); // 得到段
return s.put(key, hash, value, false);
}

减少锁粒度将引发一个新的问题:当系统获取全局锁的时候,消耗的内存比较多

虽然我们的 put 方法很好的分离了锁,但是当我们试图访问『ConcurrentHashMap 的全局信息的时候,需要同时取得所有锁才能顺利实施,比如说 size 方法,它的实现如下:

1
2
3
4
5
6
7
sum = 0;
for (int i = 0; i < segments.length; ++i) // 对所有的段加锁
segments[i].lock();
for (int i = 0; i < segments.length; ++i) // 统计总数
sum += segments[i].count;
for (int i = 0; i < segments.length; ++i) // 释放所有锁
segments[i].unlock();

事实上 size 方法不总是这样的,它先使用无锁的方式求和,如果失败才采取这样的方式。

只有在 size 这样获取全局信息不频发的情况下,减少锁粒度的方法才能提高系统吞吐量

或者说减少锁定对象的范围,从而减少锁冲突的可能。

1.3 读写分离锁替换独占锁

我们知道读写锁『ReadWriteLock』可以提高系统性能,这也是减小锁粒度的一种情况,如果说减少锁粒度是分割数据结构,那么读写锁是对系统功能点的分割

在读多写少的场景,使用读写锁可以有效提高系统的并行能力。

1.4 锁分离

将读写锁的思想进一步延伸,就是所分离。一个例子就是『java.util.concurrent.LinkedBlockingQueue』的实现。

可以回忆它的近亲,『ArrayBlockingQueue』。

同样,这里的 take 方法和 put 方法分别实现了从队列取和放入队列的功能,由于是链表,这两个操作分别作用在队列的前端和尾端。

使用独占锁,这两个方法就不可能真正并发,它们互相等待对方资源释放。

因此,在 JDK 中,我们取而代之的是使用两把不同的锁,分离 take 方法和 put 方法。

1
2
3
4
private final ReentrantLock takeLock = new ReentrantLock(); // take 方法需要持有 takeLock
private final Condition notEmpty = takeLock.newCondition();
private final ReentrantLock putLock = new ReentrantLock(); // put 方法需要持有 putLock
private final Condition notFull = putLock.newCondition();

可以发现和『ArrayBlockingQueue』很像。

以上,我们定义好「takeLock」和「putLock」,它们分别在 take 方法和 put 方法中使用,因此它们互相独立,take 方法和 take 方法竞争,put 方法和 put 方法竞争,做到削弱竞争的可能性。

下面是 take 方法的实现:

1
2
3
4
5
6
7
8
9
10
11
12
13
14
15
16
17
18
19
20
21
public E take() throws InterruptedException {
E x;
int c = -1;
final AtomicInteger count = this.count;
final ReentrantLock takeLock = this.takeLock;
takeLock.lockInterruptibly(); // 不能有两个线程同时取数据
try {
while (count.get() == 0) { // 没有可用线程进行等待
notEmpty.await(); // 等待 put 方法的通知
}
x = dequeue(); // 取得第一个数
c = count.getAndDecrement(); // 数量减一,原子操作,变量 c 是 count 减一前的数字
if (c > 1)
notEmpty.signal(); // 通知其他 take 操作
} finally {
takeLock.unlock(); // 释放锁
}
if (c == capacity)
signalNotFull(); // 通知 put 方法,已经没有空间了
return x;
}

然后是 put 方法的实现:

1
2
3
4
5
6
7
8
9
10
11
12
13
14
15
16
17
18
19
20
21
public void put(E e) throws InterruptedException {
if (e == null) throw new NullPointerException();
int c = -1;
Node<E> node = new Node<E>(e);
final ReentrantLock putLock = this.putLock;
final AtomicInteger count = this.count;
putLock.lockInterruptibly(); // 不能两个线程同时 put
try {
while (count.get() == capacity) { // 队列满了
notFull.await(); // 等待
}
enqueue(node); // 插入数据
c = count.getAndIncrement(); // 更新总是,c 是 count 加一前的数
if (c + 1 < capacity)
notFull.signal(); // 空间足够,通知其他线程
} finally {
putLock.unlock(); // 释放锁
}
if (c == 0)
signalNotEmpty(); // 插入成功,通知 take 取数据
}

通过「takeLock」和「putLock」两把锁,实现取和写的分离。

1.5 锁粗化

通常情况下,我们要求线程持有锁的时间尽可能短,完成就释放,如果对一个锁不断请求,同步,释放,那么也会消耗资源,反而不利于优化

虚拟机遇到一系列对锁的请求和释放,就会整合对锁一次的请求,减少同步次数,就是锁粗化。

1
2
3
4
5
6
7
8
9
public void demoMethod() {
synchronized(lock) {
// do sth
}
// 做其他不需要同步的工作,但很快完毕
synchronized(lock) {
// do sth
}
}

整合成以下形式:

1
2
3
4
5
6
public void demoMethod() {
synchronized(lock) {
// do sth
// 其他工作
}
}

合理粗化是有用的,但是下面的情况就不必要了:

1
2
3
4
5
for (int i = 0; i < CIRCLE; ++i) {
synchronized(lock) {
// do sth
}
}

更合理的,应该这样:

1
2
3
4
5
synchronized(lock) {
for (int i = 0; i < CIRCLE; ++i) {
// do sth
}
}

锁粗化的思想和减少持有时间正好相反,应该根据实际情况,进行权衡。

二、Java 虚拟机对锁的优化

2.1 锁偏向

如果一个线程获得锁,那么锁就进入偏向模式,再次请求这个线程,无需再做同步操作,因此在几乎没有锁竞争的场合,偏向锁很好,因为多次极有可能是同一个线程请求相同的锁。而在竞争激烈的场合,效果不佳,最可能的情况是不同线程请求相同的锁。

可以使用参数「-XX:+UseBiasedLocking」开启偏向锁。

2.2 轻量级锁

偏向锁失败,虚拟机不会立即挂起线程,而是采用轻量级锁的优化手段,简单将对象头部作为指针,指向持有锁的线程堆栈内部,以此判断线程是否持有锁。如果线程获得轻量级锁成功,则进入临界区;如果失败,则表示其他线程获得了锁,当前线程的锁清秋膨胀为重量级锁

2.3 自旋锁

锁膨胀以后,虚拟机还会最后努力一下,也许在几个 CPU 时钟周期后就获得锁了,因此虚拟机将当前线程进行几个空循环(这也是自旋的含义),如果获得就进入临界区;如果没有,才真正进行挂起。

2.4 锁消除

JVM 在 JIT 编译时,通过上下文扫描,去除不可能共享资源竞争的锁

比如我们日常使用的『Vector』,这个类是线程安全的,而如果我们在方法内使用,那么该对象就是局部变量,在虚拟机栈上分配内存,此时,这些锁同步操作就会被去除。

当在方法区外使用这个『Vector』时,就涉及了逃逸分析,不能进行锁消除了。

逃逸分析必须在「-server」模式下进行,使用「-XX:+DoEscapeAnalysis」参数打开逃逸分析,使用「-XX:+EliminateLocks」参数可以打开锁消除。

三、ThreadLocal

3.1 ThreadLocal 简单实用

加锁只是一种解决办法,另外一种办法则是使用『ThreadLocal』,感受人手一支笔。

比如下面的 demo :

1
2
3
4
5
6
7
8
9
10
11
12
13
14
15
16
17
18
19
private static final SimpleDateFormat sdf = new SimpleDateFormat("yyyy-MM-dd HH:mm:ss")
public static class ParseDate implements Runnable {
int i=0;
public ParseDate(int i){this.i=i;}
public void run() {
try{
Date t=sdf.parse("2015-03-29 19:29:"+i%60);
System.out.println(i+":"+t);
} catch (ParseException e) {
e.printstackTrace();
}
}
}
public static void main(String [] args) {
ExecutorService es=Executors.newFixedThreadPool(10);
for(int i=0;i<1000;i++) {
es.execute(new ParseDate(i));
}
}

这段代码是解析字符串类型的日期,但是一般,会有一场,因为 SimpleDateFormat.parse() 不是线程安全的,在线程池中共享这个对象会导致错误。

一个办法是在 sdf.parse() 前后加锁,而另外一个办法则是使用『ThreadLocal』为每一个线程产生一个『SimpleDateformat』对象实例

1
2
3
4
5
6
7
8
9
10
11
12
13
14
15
16
static ThreadLocal<SimpleDateFormat> t1 = new ThreadLocal<SimpleDateFormat>();
public static class ParseDate implements Runnable {
int i = 0;
public ParseDate(int i){this.i=i;}
public void run() {
try {
if (t1.get() == null) {
t1.set(new SimpleDateFormat("yyyy-MM-dd HH:mm:ss"));
}
Date t = t1.get().parse("2015-03-29 19:29:" + i % 60);
System.out.println(i+":"+t);
} catch (ParseException e) {
e.printStackTrace();
}
}
}

如果线程不持有『SimpleDateformat』对象,则新建,否则直接使用。当然,如果再应用上为每一个线程分配相同的对象,那么『ThreadLocal』也不能保证线程安全。

3.2 ThreadLocal 的实现原理

『ThreadLocal』如何保证对象只有当前线程可以访问呢?问题自然是它的 setget 两个方法。从 set 开始看:

1
2
3
4
5
6
7
8
public void set(T value) {
Thread t = Thread.currentThread();
ThreadLocalMap map = getMap(t);
if (map != null)
map.set(this, value);
else
createMap(t, value);
}

首先获得当前线程,然后获得线程的『ThreadLocal』,并将值设入『ThreadLocalMap』中,这可以理解成一个『HashMap』,它是定义在『Thread』内部的成员:

1
ThreadLocal.ThreadLocalMap threadLocals = null;

我们在设置『ThreadLocal』的数据,就是写入这个「map」中,其中「key」是当前对象,而「value」是我们需要的值,那么 get 就是从「map」中取出数据:

1
2
3
4
5
6
7
8
9
10
11
public T get() {
Thread t = Thread.currentThread();
ThreadLocalMap map = getMap(t);
if (map != null) {
ThreadLocalMap.Entry e = map.getEntry(this);
if (e != null) {
return (T)e.value;
}
}
return setInitialValue();
}

首先 get 获得当前线程的『ThreadLocalMap』对象,然后通过自己作为「key」获得内部实际数据。

这些变量维护在『Thread』内部,意味着只要线程不退出,对象引用一直存在。

线程退出,『Thread』类会进行清理工作:

1
2
3
4
5
6
7
8
9
10
11
12
13
private void exit() {
if (group != null) {
group.threadTerminated(this);
group = null;
}
target = null;
// 加速资源清理
threadLocals = null;
inheritableThreadLocals = null;
inheritedAccessControlContext = null;
blocker = null;
uncaughtExceptionHandler = null;
}

所以,如果使用线程池,那么线程未必会退出,如果设置对象到『ThreadLocal』但是又不清理,几次之后,对象也无法回收,也不能再用,因此,最好使用 ThreadLocal.remove() 将变量移除。


我们也可以像释放普通变量那样释放『ThreadLocal』。我们会写下 obj=null 这样的代码,会更容易让垃圾回收器发现对象,从而回收。

同样,对于『ThreadLocal』我们也可以使用 t1=null ,现在这个对象的所有线程局部变量都可能被回收。

下面的代码执行以后:

1
2
3
4
5
6
7
8
9
10
11
12
13
14
15
16
17
18
19
20
21
22
23
24
25
26
27
28
29
30
31
32
33
34
35
36
37
38
39
40
41
42
43
44
45
46
47
48
49
50
51
52
53
54
55
56
57
58
59
public class ThreadLocalDemo_Gc {
static volatile ThreadLocal<SimpleDateFormat> t1 = new ThreadLocal<SimpleDateFormat>() {
@Override
protected void finalize() throws Throwable {
System.out.println(this.toString() + " is gc");
}
};
static volatile CountDownLatch cd = new CountDownLatch(10000);

public static class ParseDate implements Runnable {
int i = 0;

public ParseDate(int i) {
this.i = i;
}

@Override
public void run() {
try {
if (t1.get() == null) {
t1.set(new SimpleDateFormat("yyyy-MM-dd HH:mm:ss") {
@Override
protected void finalize() throws Throwable {
System.out.println(this.toString() + " is gc");
}
});
System.out.println(Thread.currentThread().getId() + ":create SimpleDateFormat");
}
Date t = t1.get().parse("2019-02-19 22:08:" + i % 60);
} catch (ParseException e) {
e.printStackTrace();
} finally {
cd.countDown(); // 一个线程完成,计时器减一
}
}
}

public static void main(String[] args) throws InterruptedException {
ExecutorService es = Executors.newFixedThreadPool(10);
for (int i = 0; i < 10000; ++i) {
es.submit(new ParseDate(i));
}
cd.wait(); // 等待 CountDownLatch 完成
System.out.println("mission complete!");
t1 = null; // 进行一次 GC 同时也是单单删除了 t1
System.gc();
System.out.println("first GC complete!!");
// 在设置 ThreadLocal 的时候,会清除 ThreadLocalMap 中的无效对象
t1 = new ThreadLocal<SimpleDateFormat>();
cd = new CountDownLatch(10000);
for (int i = 0; i < 10000; ++i) {
es.execute(new ParseDate(i));
}
cd.await(); // 等待 CountDownLatch 完成
Thread.sleep(1000);
System.gc();
System.out.println("second GC complete!!");
}
}

首先10个线程创建各自的『SimpleDateFormat』,然后进行一次 GC ,发现一开始的『ThreadLocal』对象被回收,因为我们把它设置为了 「null」 ;接着提交第二次任务,也创建10个『SimpleDateFormat』,然后第二次没有单独指定就进行 GC ,发现第一次全部10个『SimpleDateFormat』被回收了,

出现这样的原因是因为『ThreadLocalMap』的实现使用了弱引用,JVM 在垃圾回收的时候,如果发现弱引用,会立即回收,当『ThreadLocal』的外部强引用被回收时,『ThreadLocalMap』的「key」会变成 null ,因此在第一次 GC 时,一个『ThreadLocal』对象被回收,第二次其对应的10个『SimpleDateFormat』自然被删除了。

3.3 对性能有何帮助

如果共享对象对于竞争的处理容易引起性能损失,我们就应该使用『ThreadLocal』为每一个线程分配单独的对象。

比如多线程下产生随机数:

1
2
3
4
5
6
7
8
9
10
11
12
13
14
15
16
17
18
19
20
21
22
23
24
25
26
27
28
29
30
31
32
33
34
35
36
37
38
39
40
41
42
43
44
45
46
47
48
49
50
51
52
53
54
55
56
57
58
59
60
61
62
63
public class RndTaskTest {
public static final int GEN_COUNT = 10000000;
public static final int THREAD_COUNT = 4;
static ExecutorService exe = Executors.newFixedThreadPool(THREAD_COUNT);
public static Random rnd = new Random(123);
public static ThreadLocal<Random> tRnd = new ThreadLocal<Random>() {
@Override
protected Random initialValue() {
return new Random(123);
}
};

public static class RndTask implements Callable<Long> {
private int mode = 0;

public RndTask(int mode) {
this.mode = mode;
}

public Random getRandom() {
if (mode == 0) {
return rnd;
} else if (mode == 1) {
return tRnd.get();
} else {
return null;
}
}

@Override
public Long call() {
long b = System.currentTimeMillis();
for (long i = 0; i < GEN_COUNT; i++) {
getRandom().nextInt();
}
long e = System.currentTimeMillis();
System.out.println(Thread.currentThread().getName() + "spend " + (e - b) + "ms");
return e - b;
}
}

public static void main(String[] args) throws ExecutionException, InterruptedException {
Future<Long>[] futs = new Future[THREAD_COUNT];
for (int i = 0; i < THREAD_COUNT; ++i) {
futs[i] = exe.submit(new RndTask(0));
}
long totaltime = 0;
for (int i = 0; i < THREAD_COUNT; ++i) {
totaltime += futs[i].get();
}
System.out.println("多线程访问同一个 Random 实例:" + totaltime + "ms");
// ThreadLocal 的情况
for (int i = 0; i < THREAD_COUNT; ++i) {
futs[i] = exe.submit(new RndTask(1));
}
totaltime = 0;
for (int i = 0; i < THREAD_COUNT; ++i) {
totaltime += futs[i].get();
}
System.out.println("使用 ThreadLocal 包装 Random 实例:" + totaltime + "ms");
exe.shutdown();
}
}

从运行结果发现,如果多线程共享同一个『Random』实例,总耗时接近13秒,在『ThreadLocal』模式下,耗时不到1秒。

四、无锁

4.1 比较交换

CAS 包含三个参数「V E N」,V 表示要更新的变量,E 表示预期,N 表示新值,仅当 V 等于 E 时,才会将 V 改成 N ,如果 V 和 E 不同,表示有其他线程进行了修改,则什么都不做。最后,CAS 会返回当前 V 的真实值。

CAS 是乐观态度的操作,它总是认为可以完成操作,当多个线程同时使用 CAS 操作一个变量时,只有一个会胜出,并成功更新,其余均会失败,失败的线程不会挂起,仅是被告知失败,并允许重新尝试

从 JDK5 以后,虚拟机可以使用这个指令来实现并发操作和并发数据结构。

4.2 AtomicInteger

JDK 并发包里面实现了一些直接使用 CAS 操作的线程安全的类型。其中,最常用的就是『AtomicInteger』,与『Integer』不同,它是可变的,而且是线程安全的,下面是『AtomicInteger』的一些主要方法,其他原子类也是类似的:

1
2
3
4
5
6
7
8
9
10
public final int get(); // 取得当前值
public final void set(int newValue); // 设置当前值
public final int getAndSet(int newValue); // 设置新值,并返回旧值
public final boolean compareAndSet(int expect, int u); // 如果当前值是 expect 则设置成 u
public final int getAndIncrement(); // 当前值加1,返回旧值
public final int getAndDecrement(); // 当前值减1,返回旧值
public final int getAndAdd(int delta); // 当前值加 delta ,返回旧值
public final int incrementAndGet(); // 当前值加1,返回新值
public final int decrementAndGet(); // 当前值减1,返回新值
public final int addAndGet(int delta); // 当前值加 delta ,返回新值

就内部实现而言,『AtomicInteger』中保存一个核心字段:

1
private volatile int value;

它表示『AtomicInteger』的当前实际取值,此外还有:

1
private static final long valueOffset;

它保存着「value」字段在『AtomicInteger』对象中的偏移量,这个偏移量是实现『AtomicInteger』的关键。

下面是一个关于『AtomicInteger』的 demo :

1
2
3
4
5
6
7
8
9
10
11
12
13
14
15
16
17
18
19
20
21
22
public class AtomicIntegerDemo {
static AtomicInteger i = new AtomicInteger();

public static class AddThread implements Runnable {

@Override
public void run() {
for (int k = 0; k < 10000; ++k)
i.incrementAndGet();
}
}

public static void main(String[] args) throws InterruptedException {
Thread[] ts = new Thread[10];
for (int k = 0; k < 10; ++k) {
ts[k] = new Thread(new AddThread());
}
for (int k = 0; k < 10; ++k) ts[k].start();
for (int k = 0; k < 10; ++k) ts[k].join();
System.out.println(i);
}
}

可以发现,最后输出的结果是100000,所以执行是正确的,如果线程不安全,结果应该小于100000。

下面是 incrementAndGet() 的内部实现:

1
2
3
4
5
6
7
8
public final int incrementAnGet() 
for (;;) {
int current = get();
int next = current + 1;
if (compareAndSet(current, next));
return next;
}
}

get 方法就非常简单,只是返回内部的「value」。

1
2
3
public final int get() {
return value;
}

这里,我们应该好奇为什么设置一个值这么简单的操作都需要一个死循环,CAS操作未必成功,对于不成功,我们不断重复尝试

和『AtomicInteger』类似的还有『AtomicLong』来代替『Long』类型,『AtomicBoolean』代替『Boolean』类型,『AtomicRegerence』表示对象引用。

4.3 Java 中的指针:Unsafe 类

我们特别注意到 compareAndSet 方法的实现:

1
2
3
public final boolean compareAndSet(int expect, int update) {
return unsafe.compareAndSwapInt(this, valueOffset, expect, update);
}

这里涉及一个特殊的变量「unsafe」,它是『sun.misc.Unsafe』类型,从名字看,什么是不安全?指针是不安全的,这也是在 Java 中把指针去除的原因。

这里的『Unsafe』就是封装了一些类似指针的操作,compareAndSwapInt() 方法是一个 native 方法,它的定义如下:

1
public final native boolean compareAndSwapInt(Object o, long offset, int expected, int x);

第一个参数「o」是给定的对象,「offset」是对象内的偏移量,其实就是一个字段到对象头部的偏移量,通过这个偏移量可以快速定位字段,「expected」表示期望,「x」表示要设置的值。如果指定的字段的值等于「expected」,那么就会把它设置为「x」。

compareAndSwapInt 方法的内部,使用 CAS 原子指令,此外,『Unsafe』类还提供了一些方法:

1
2
3
4
5
6
7
8
9
10
11
12
// 获得给定对象偏移量上的 int 值
public native int getInt(Object o, long offset);
// 设置给定对象偏移量上的 int 值
public native void putInt(Object, long offset, int x);
// 获得字段在对象中的偏移量
public native long objectFieldOffset(Field f);
// 设置给定对象的 int 值,使用 volatile 语义
public native void putIntVolatile(Object o, long offset, int x);
// 获得给定对象的 int 值,使用 volatile 语义
public native int getIntVolatile(Object o, long offset);
// 和 putIntVolatile 一样,但是要求被操作字段是 volatile 类型
public native void putOrderedInt(Object o, long offset, int x);

可以回忆『ConcurrentLinkedQueue』中对「node」的一些操作就是使用『Unsafe』类来实现的。

虽然 Java 抛弃了指针,但是在关键时刻,类似指针的技术是必不可少的。对于『Unsafe』实现就是最好的例子,但是 JDK 的开发人员不希望大家使用这个类,获取『Unsafe』实例的方法是调用其工厂方法 getUnsafe ,它的实现是这样:

1
2
3
4
5
6
public static Unsafe getUnsafe() {
Class cc = Reflection.getClasserClass();
if (cc.getClassLoader() != null)
throw new SecurityException("Unsafe");
return theUnsafe;
}

它会检查 getUnsafe 函数的类,如果这个类的『ClassLoader』不为「null」,就抛出异常,这导致我们无法直接使用『Unsafe』类。

4.4 无锁对象引用:AtomicReference

在介绍『AtomicReference』前,先提出一个关于原子操作的逻辑上的不足。

当我们在获得对象当前值以后,准备修改为新值前,对象被其他线程连续修改了两次,而经过修改后,对象的值又恢复为旧值,这样,我们无法判断对象是否被修改过。

现实中,我们要修改的值,通常不仅仅取决于当前值,还和对象的过程变化有关,这时,『AtomicRegerence』就无能为力了。

有个蛋糕店,为了挽留客户,对余额低于20元的客户一次赠送20元,但只能被赠送一次,首先定义账户余额:

1
2
3
4
5
6
7
8
9
10
11
12
13
14
15
16
17
18
19
20
21
22
23
24
25
26
27
28
29
30
31
32
33
34
35
36
37
38
39
40
41
42
43
44
45
46
47
48
49
50
51
52
53
54
55
56
57
58
public class AtomicReferenceTest {
static AtomicReference<Integer> money = new AtomicReference<>();

public static void main(String[] args) {
// 设置账户低于20,显然需要一个需要被充值的账户
money.set(19);

// 模拟多个线程同时更新后台数据库,为用户充值
for (int i = 0; i < 3; ++i) {
new Thread() {
@Override
public void run() {
while (true) {
while (true) {
Integer m = money.get();
if (m < 20) {
if (money.compareAndSet(m, m + 20)) {
System.out.println("余额低于20元,充值成功,余额为" + money.get() + "元");
break;
}
} else {
// System.out.println("余额大于20元,无需充值");
break;
}
}
}
}
}.start();
}

// 用户消费线程,模拟消费行为
new Thread() {
@Override
public void run() {
for (int i = 0; i < 100; ++i) {
while (true) {
Integer m = money.get();
if (m > 10) {
System.out.println("大于10元");
if (money.compareAndSet(m, m - 10)) {
System.out.println("消费10元,剩余" + money.get());
break;
}
} else {
System.out.println("金额不足");
break;
}
}
try {
Thread.sleep(100);
} catch (InterruptedException e) {
e.printStackTrace();
}
}
}
}.start();
}
}

我们发现,这个账户被反复多次充值,修改后的值等于原值,这种情况就比较尴尬。运行结果如下:

1
2
3
4
5
6
7
8
9
10
11
12
13
14
余额低于20元,充值成功,余额为39元
大于10元
消费10元,剩余29
大于10元
消费10元,剩余19
余额低于20元,充值成功,余额为39元
大于10元
消费10元,剩余29
大于10元
消费10元,剩余19
余额低于20元,充值成功,余额为39元
大于10元
消费10元,剩余29
...

4.5 带时间戳的对象引用:AtomicStampedReference

之所以『AtomicRegerence』无法解决上述问题的根本原因,对象值本身和状态被画上了等号,『AtomicStampedReference』不仅维护了对象值,还维护了一个时间戳,当值被修改了,时间戳也要进行更新。

它新增了几个关于时间戳的 Api :

1
2
3
4
5
6
7
8
// 比较设置参数依次:期望 新值 期望时间戳 新时间戳
public boolean compareAndSet(V expectedReference, V newReference, int expectedStamp, int newStamp);
// 获取当前对象引用
public V getReference();
// 获取当前时间戳
public int getStamp();
// 设置当前对象引用和时间戳
public void set(V newReference, int newStamp);

有了这个法宝,我们不用担心对象被写坏了,修正贵宾发的 demo :

1
2
3
4
5
6
7
8
9
10
11
12
13
14
15
16
17
18
19
20
21
22
23
24
25
26
27
28
29
30
31
32
33
34
35
36
37
38
39
40
41
42
43
44
45
46
47
48
49
50
51
52
53
54
55
56
57
58
public class AtomicStampedReferenceTest {
static AtomicStampedReference<Integer> money = new AtomicStampedReference<>(19, 0);

public static void main(String[] args) {
// 模拟多线程更新后台,为用户充值
for (int i = 0; i < 3; ++i) {
final int timeStamp = money.getStamp();
new Thread() {
@Override
public void run() {
while (true) {
while (true) {
Integer m = money.getReference();
if (m < 20) {
if (money.compareAndSet(m, m + 20, timeStamp, timeStamp + 1)) {
System.out.println("余额小于20元,充值成功,余额" + money.getReference() + "元");
break;
}
} else {
// System.out.println("余额大于20元,无需充值");
break;
}
}
}
}
}.start();

// 用户消费线程,模拟消费行为
new Thread() {
@Override
public void run() {
for (int i = 0; i < 100; ++i) {
while (true) {
int timeStamp = money.getStamp();
Integer m = money.getReference();
if (m > 10) {
System.out.println("大于10元");
if (money.compareAndSet(m, m - 10, timeStamp, timeStamp + 1)) {
System.out.println("消费10元,剩余" + money.getReference());
break;
}
} else {
System.out.println("金额不足");
break;
}
}
try {
Thread.sleep(100);
} catch (InterruptedException e) {
e.printStackTrace();
}
}
}
}.start();
}

}
}

因为修改时间戳,所以系统不可能发生二次赐予,运行结果如下:

1
2
3
4
5
6
7
8
9
10
余额小于20元,充值成功,余额39元
大于10元
消费10元,剩余29
大于10元
消费10元,剩余19
大于10元
消费10元,剩余9
金额不足
金额不足
...

4.6 数组也能无锁:AtomicIntegerArray

除了对于基本类型,JDK 还提供了数组等复合结构,当前可用的原子数组有:『AtomicIntegerArray』、『AtomicLongArray』、『AtomicReferenceArray』。这里以『AtomicIntegerArray』为例,展示原子数组的使用方式。

它的本质是对 int[] 的封装,使用『Unsafe』类通过 CAS 的方式控制 int[] 在多线程下的安全性,其核心 Api 如下:

1
2
3
4
5
6
7
8
9
10
11
12
13
14
// 获得数组第i个下标元素
public final int get(int i);
// 获得数组长度
public final int length();
// 将数组第i个下标设置成newValue,并返回旧值
public final int getAndSet(int i, int newValue);
// 进行CAS操作,如果第i个下标是expect,则设置成update,设置成功返回true
public final boolean compareAndSet(int i, int expect, int update);
// 将第i个下标的元素加1
public final int getAndIncrement(int i);
// 将第i个下标的元素减1
public final int getAndDecrement(int i);
// 将第i个下标的元素增加delta
public final int getAndAdd(int i, int delta);

跑一个例子:

1
2
3
4
5
6
7
8
9
10
11
12
13
14
15
16
17
18
19
20
21
22
23
24
25
26
27
public class AtomicIntegerArrayDemo {
static AtomicIntegerArray arr = new AtomicIntegerArray(10);

public static class AddThread implements Runnable {
@Override
public void run() {
for (int k = 0; k < 10000; ++k) {
arr.getAndIncrement(k % arr.length());
}
}
}

public static void main(String[] args) throws InterruptedException {
Thread[] ts = new Thread[10];
for (int k = 0; k < 10; ++k) {
ts[k] = new Thread(new AddThread());
}
for (int k = 0; k < 10; ++k) {
ts[k].start();
}
for (int k = 0; k < 10; ++k) {
ts[k].join();
}
System.out.println(arr);
}

}

上面声明一个包含10个元素的数组,每个元素各加1000次,每个线程结果都是10000,如果线程不安全,那么即通过应该会小于10000,结果如下,可以看出,『AtomicIntegerArray』保证了数组的线程安全性。

1
[10000, 10000, 10000, 10000, 10000, 10000, 10000, 10000, 10000, 10000]

4.7 让普通变量也享受原子操作:AtomicIntegerFieldUpdater

如果我们随意在开发中将一个变量变成线程安全的,那么需要在每一处使用它的地方都进行修改,并且这还不符合开闭原则,系统功能的增加应该是开放的,而修改应该是相对保守的,一个一个修改也令人厌烦。

『AtomicIntgerFieldUpdater』类可以在不改动原有代码基础上,让普通变量享受 CAS 带来的线程安全性,这个「Updater」有三种,分别是『AtomicIntegerFieldUpdater』、『AtomicLongFieldUpdater』、『AtomicReferenceFieldUpdater』它们可以对『int』、『long』以及普通对象进行 CAS 修改。

假设有一个选举,每个选民有一票,投了记为1,没投记为0,最终选票显然就是所有数据的求和。

1
2
3
4
5
6
7
8
9
10
11
12
13
14
15
16
17
18
19
20
21
22
23
24
25
26
27
28
29
30
31
public class AtomicIntegerFieldUpdaterDemo {
public static class Candidate {
int id;
volatile int score;
}

public final static AtomicIntegerFieldUpdater<Candidate> scoreUpdater = AtomicIntegerFieldUpdater.newUpdater(Candidate.class, "score");

// 检查Updater是否工作正确
public static AtomicInteger allScore = new AtomicInteger(0);

public static void main(String[] args) throws InterruptedException {
final Candidate stu = new Candidate(); // 假设只有一个候选人
Thread[] t = new Thread[10000];
for (int i = 0; i < 10000; ++i) {
t[i] = new Thread() {
@Override
public void run() {
if (Math.random() > 0.4) {
scoreUpdater.incrementAndGet(stu);
allScore.incrementAndGet();
}
}
};
t[i].start();
}
for (int i = 0; i < 10000; ++i) t[i].join();
System.out.println("score=" + stu.score);
System.out.println("allScore=" + allScore);
}
}
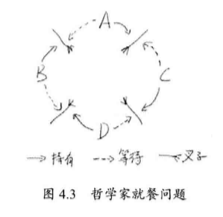
这里,候选人的得票数被记录在「Candidate.score」中,它不是线程安全的,而「allScore」是线程安全的,它是用来检验结果是否正确的。

  1. 「Updater」只能修改可见范围内的变量,因为使用了反射,如果上面的「score」是 private 的,那么是不行的。
  2. 为了保证正确读取,它必须是 volatile 类型。
  3. 由于 CAS 操作会对对象实例中的偏移量直接赋值,因此,不支持 static 字段。Unsafe.objectFieldOffset() 不支持静态变量。

4.8 无锁 Vector 实现

使用『AtomicReferenceArray』实现。

4.9 细看 SynchronousQueue 的实现

曾经我们看过一个非常特殊的等待队列『SynchronousQueue』,任何一个对它的写需要等待读,因此与其说它是一个队列,不如说是一个通道。它将 puttake 两个功能截然不同的操作抽象为一个共通的方法 Transferer.tansfer() ,完整签名如下:

1
Object transfer(Object e, boolean timed, long nanos);

当参数 e 为非空,表示当前操作传递给一个消费者,如果为空,则表示当前操作需要请求一个数据。timed 参数决定是否存在 timeout 时间。nanos 表示了 timeout 的时长。如果返回值非空,则表示数据已经接受或正常提供,如果为空,则表示失败。

它的内部维护了一个线程等待队列,等待队列会保存等待线程以及相关数据的信息,比如生产者将数据放入『SynchronousQueue』时,如果没有消费者接收,那么数据本身和线程对象都会打包在队列中等待。

Transferer.transfer() 函数的实现是『SynchronousQueue』的核心,它分三个步骤:

  1. 如果等待队列为空,或者队列中节点的类型和本次操作是一致的,那么将当前操作压入队列等待;
  2. 如果等待队列中的元素和本次操作是互补的,则插入一个「完成」状态,并且让他匹配到一个等待节点上。接着弹出这两个节点,使得对应的两个线程继续执行;
  3. 如果线程发现等待队列的节点是「完成」节点,则帮助节点完成任务。

五、有关死锁的问题

我们可以用代码来模拟哲学家就餐问题:

1
2
3
4
5
6
7
8
9
10
11
12
13
14
15
16
17
18
19
20
21
22
23
24
25
26
27
28
29
30
31
32
33
34
35
36
37
38
39
40
41
42
43
44
45
46
47
48
49
public class DeadLock extends Thread {
protected Object tool;
static Object fork1 = new Object();
static Object fork2 = new Object();

public DeadLock(Object obj) {
this.tool = obj;
if (tool == fork1)
this.setName("哲学家A");
if (tool == fork2)
this.setName("哲学家B");
}

@Override
public void run() {
if (tool == fork1) {
synchronized (fork1) {
try {
Thread.sleep(500);
} catch (Exception e) {
e.printStackTrace();
}
synchronized (fork2) {
System.out.println("哲学家 A 开始吃饭了");
}
}
}
if (tool == fork2) {
synchronized (fork2) {
try {
Thread.sleep(500);
} catch (Exception e) {
e.printStackTrace();
}
synchronized (fork1) {
System.out.println("哲学家 B 开始吃饭了");
}
}
}
}

public static void main(String[] args) throws InterruptedException {
DeadLock A = new DeadLock(fork1);
DeadLock B = new DeadLock(fork2);
A.start();
B.start();
Thread.sleep(1000);
}
}

哲学家 A 先用叉子1,哲学家 B 先占用叉子2,接着他们相互等待,都没有办法同时获得两个叉子。